Introduction
Installing a Level 2 home EV charging station involves far more than plugging in an appliance. The work typically requires a new dedicated circuit, a breaker installation, permit applications, and sometimes a full panel upgrade.
31% of U.S. homes have electrical panels rated at 100 amps or less, and approximately 20% of all EV charger installations require a panel upgrade before a charger can be safely installed.
Homeowners can research and prepare, but the actual electrical installation must be performed by a licensed electrician. This is especially critical in older homes (30+ years) where panels may be undersized and wiring may not meet modern load requirements.
Improper installation carries real consequences:
- Overloaded circuits and electrical fires from undersized or low-quality wiring
- Voided charger warranties
- Failed permit inspections that require costly rework
The U.S. Consumer Product Safety Commission has issued multiple recalls for faulty EV charging equipment that can ignite or cause connected batteries to catch fire. Getting the installation right — and using the right equipment — is a safety requirement.
Key Takeaways
- Level 2 EV chargers require a dedicated 240V circuit, correct breaker sizing (125% of load), and the right wire gauge
- This is not a DIY project — improper wiring is a leading cause of electrical fires
- Older homes commonly need a panel upgrade before a charger can be safely installed
- Installation covers panel assessment, circuit work, charger mounting, wiring, and permit inspection
- Average installation cost in Iowa is $2,246, excluding hardware
- Always hire a licensed electrician; local permits and inspections are required in Iowa
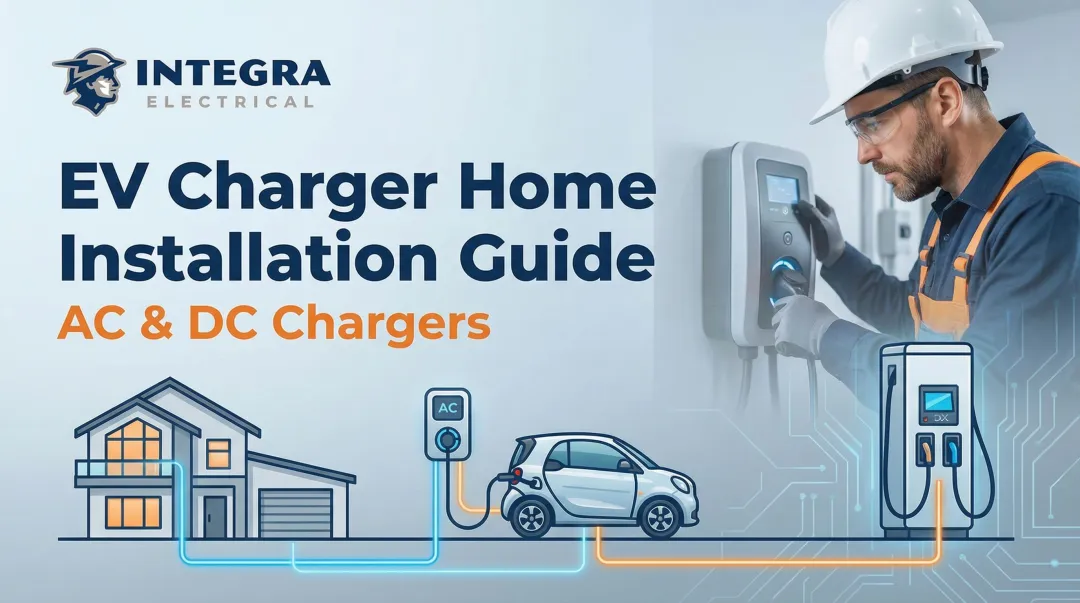
EV Charging Station Installation Guide
The installation process follows a defined sequence: site and panel assessment → circuit and conduit work → charger mounting and wiring → testing and permit inspection. Skipping or rushing any phase leads to safety hazards or failed inspections.
Expect realistic timelines: a straightforward installation in a newer home may take a few hours. Older homes or those requiring panel upgrades can extend the project by days and involve utility coordination.
Prerequisites and Safety Considerations
Electrical panel readiness is the first checkpoint. Most Level 2 chargers require a 200-amp service, or the home will need a panel upgrade. Homes built before the 1990s in Des Moines commonly have 60–100 amp panels that cannot safely support EV charging without an upgrade. A licensed electrician should perform a load calculation before any work begins.
Integra Electrical offers a complimentary Safety Evaluation that includes a Digital Voltage Analyzer to detect overloaded circuits and hidden risks before installation starts—particularly valuable for homes 30 years and older.
Dedicated circuit requirement: The charger must be on its own 240V dedicated circuit and cannot share with other appliances. NEC 625.41 mandates that EVSE circuits be sized at 125% of the maximum load. A 48-amp charger requires a 60-amp breaker.
Wire gauge and conduit: Correct wire gauge is non-negotiable. For example:
- 50-amp circuit (40A EVSE): 6 AWG copper
- 60-amp circuit (48A EVSE): 4 AWG copper
Conduit type and run distance from panel to charger location affect both safety and cost.
Location and access: Place the charger where the vehicle parks, with minimal distance from the panel. Garage installation is preferred. Outdoor placement requires weatherproof-rated equipment (NEMA 4 or higher). Two-EV households should plan conduit capacity for a future second circuit.
Permit requirement: Most jurisdictions, including Des Moines Metro, require an electrical permit for new 240V circuits. A licensed electrician handles the permit application and ensures wiring methods meet local code. Skipping permits can result in fines and complications when selling the home.
Tools and Parts Required
The electrician will use or specify these core components:
- Level 2 EVSE unit — safety-certified by UL, ETL, or another OSHA-recognized testing lab
- Double-pole breaker — sized per the 80% rule (e.g., 60A for a 48A charger)
- Correct-gauge copper wire and conduit — 6 AWG for 50A circuits, 4 AWG for 60A circuits
- Weatherproof enclosure or junction box — if outdoor
- Mounting hardware — secure to wall or post
- NEMA 14-50 outlet or hardwiring materials — depending on charger type
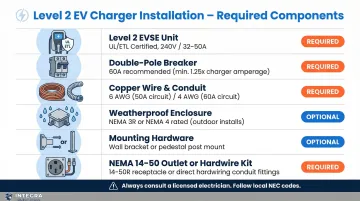
Essential vs. optional: The dedicated breaker, correct wire gauge, and conduit are non-negotiable. Smart charger features (Wi-Fi, scheduling, energy monitoring) are optional but add long-term value.
Lower-quality outlets or wire not rated for continuous high-load use are a documented cause of melted components and electrical fires in EV charging setups. Only commercial-grade materials rated for sustained 4–10 hour charging cycles should be used.
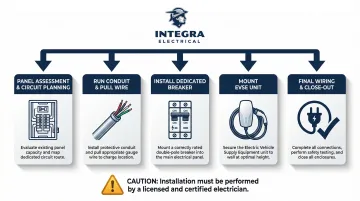
How to Install a Home EV Charging Station: Step-by-Step
Installation follows a strict sequence. Each step below builds on the last — the panel must be ready before wire is pulled, and wire must be landed correctly before the charger is powered.
Step 1 — Panel assessment and circuit planning
The electrician performs a load calculation to confirm panel capacity, identifies the optimal breaker slot, and maps the cable run from the panel to the charger location. If the panel can't support the new circuit, a panel upgrade or load management device is addressed before any other work begins.
Step 2 — Run conduit and pull wire
Conduit is routed from the panel to the charger mounting location, following the shortest practical path while meeting code requirements for securing intervals. Wire is pulled through conduit and left with sufficient service loop (extra slack for future connections) at both ends.
Step 3 — Install the dedicated breaker
A new double-pole breaker of the correct amperage is installed in the panel. Wires are landed and torqued to manufacturer spec, and the panel is labeled. Proper torque is critical: loose connections cause arcing and, eventually, fires.
Step 4 — Mount the EVSE unit
With the panel work complete, the charger is secured to the wall or post at the correct height for the vehicle's charge port. Mounting surface must be structurally sound. Outdoor units require a weatherproof enclosure and are positioned to protect the cable from vehicle traffic.
Step 5 — Final wiring connections and close-out
The electrician connects line wires to the EVSE terminals per manufacturer instructions, secures the ground wire, and closes all junction boxes. A visual inspection confirms everything is correct before the breaker is energized.
Post-Installation Checks and Validation
Visual and structural checks: Before powering up, inspect for:
- Conduit secured at required intervals with no exposed conductors
- Wire connections tight and box covers in place
- Mounting hardware confirmed solid at the charger location
Functional testing: Test voltage at the charger terminals with a multimeter, then perform a test charge with the vehicle and verify the charger status indicator and vehicle charge confirmation. For smart chargers, complete app pairing and confirm data reporting.
Permit inspection: Schedule and pass the required electrical inspection. The inspector confirms wiring methods, breaker sizing, grounding, and code compliance. Skipping this step can affect home insurance and create problems at point of sale.
Common Installation Problems and Fixes
Most residential EV charger problems emerge immediately after installation or within the first few charge cycles. They are almost always the result of undersized components, incorrect wiring, or skipped validation steps.
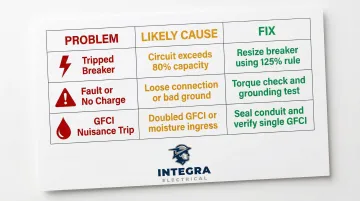
Tripped Breaker During Charging
The breaker trips repeatedly during charging sessions, often after 30–60 minutes.
What's happening: The circuit is running above 80% of the breaker's rated capacity for an extended period — a direct violation of the continuous load rule. A worn or undersized breaker can produce the same symptom.
Fix: A licensed electrician should verify the charger's amp draw against the breaker rating and replace the breaker with one sized to handle 125% of the charger's rated output. Resetting without diagnosing the root cause risks repeat trips and potential wiring damage.
Charger Shows "Fault" or Fails to Initiate Charging
The charger powers on but displays a fault code, or the vehicle does not begin charging.
Likely cause: A loose or improperly torqued wiring connection at the panel or charger terminal, incorrect wire polarity, or a ground fault from improper grounding. Older Des Moines homes with outdated grounding systems are especially susceptible.
Fix: Power down the circuit completely before inspecting. A licensed electrician should:
- Check all terminal connections for torque spec compliance
- Verify wire polarity at both the panel and charger terminal
- Test grounding continuity end-to-end
Never troubleshoot live wiring.
GFCI Nuisance Tripping on Outdoor Installations
The charger's built-in GFCI or a GFCI outlet trips frequently without an apparent fault, interrupting charging mid-session.
Likely causes (two distinct issues are often at play):
- Doubled GFCI protection: Per NEC 625.54, all EV charging receptacles require GFCI protection — but pairing a GFCI breaker with an EVSE's internal CCID creates conflicts that trigger nuisance trips.
- Moisture or improper outdoor rating: Moisture ingress into conduit or an enclosure not rated for outdoor use will cause the same symptom.
Fix: Confirm the EVSE's NEMA enclosure rating, seal all conduit entry points, and verify GFCI protection isn't stacked. Hardwiring the EVSE eliminates double GFCI conflicts entirely and is the recommended approach for outdoor installations.
Pro Tips for Installing Your EV Charging Station Effectively
Always get a load calculation before specifying the charger
Don't assume a 200-amp panel has enough available capacity. Total household electrical load — including HVAC, electric appliances, and any planned additions — must be factored in. This step prevents expensive rework after installation.
For homes 30 years and older, schedule a full electrical safety inspection before starting
Aging wiring, outdated breaker panels, and deteriorated insulation can create dangerous conditions when a high-draw EV circuit is added. Federal Pacific and Zinsco panels are common in older Iowa homes — and FPE Stab-Lok panels have documented failure-to-trip rates as high as 40–60%. Polk County explicitly requires FPE panel replacement during service updates.
Integra Electrical's licensed technicians serve older Des Moines-area homes and include a pre-installation safety evaluation to catch these risks before any EV charger work begins.
Future-proof the installation
Even if you're starting with a 50-amp circuit, run conduit sized to accommodate a larger wire gauge. It's a low-cost step during installation that avoids costly rework if you add a second EV or upgrade to a higher-output charger later.
Document everything
Before walls are closed, capture the details that will matter later:
- Photograph conduit runs, wire connections, and breaker configurations
- Retain the permit application and final inspection sign-off
- Keep a copy accessible — most home insurers require it, and buyers often ask for it during the sale process
Conclusion
EV charger installation quality directly determines charging reliability, household electrical safety, and long-term equipment performance. Cutting corners on wire gauge, breaker sizing, or permitting creates risks that build quietly — showing up years later as tripped breakers, voided warranties, or worse.
Done right, it looks like this:
- Licensed electrician pulls the permit and sizes the circuit correctly
- Dedicated 240V circuit with proper wire gauge and breaker protection
- Charger mounted, wired, and tested before the inspector signs off
- Panel capacity confirmed — or upgraded — before installation begins
Treat it as the electrical upgrade it actually is, not a shortcut-friendly weekend project. For Des Moines metro homeowners, Integra Electrical handles EV charger installations with the same safety-first approach they've brought to residential electrical work since 2003.
Frequently Asked Questions
How much does it cost to install an EV charging station at home?
The average EV charger installation in Iowa costs $2,246, excluding hardware. Panel upgrades are a common additional cost, ranging from $1,500 to $2,500+. For an accurate estimate based on your home's electrical capacity, get a quote from a licensed electrician.
What are the electrical and wiring requirements for a Level 2 EV charger installation?
Level 2 chargers require a dedicated 240V circuit, a correctly sized double-pole breaker (following the 125% rule), and the right wire gauge — 6 AWG copper for 50-amp circuits, 4 AWG for 60-amp. Proper grounding and conduit are also mandatory for safety and code compliance.
Can I plug my EV into a standard 240V outlet?
Some Level 2 chargers support plug-in use via a NEMA 14-50 outlet, but that outlet must be on a dedicated circuit with correct amperage and commercial-grade components. A licensed electrician should install the outlet—never repurpose an existing dryer outlet for EV charging.
What is the 80% rule for EV charging?
Continuous electrical loads — including EV charging — must not exceed 80% of a breaker's rated capacity. That's why a 48-amp charger requires a 60-amp breaker: EV charging draws sustained load for hours, so the circuit must be sized to 125% of the charger's maximum draw.
What are the three types of EV charging stations?
Level 1 uses 120V, is slow, and requires no installation. Level 2 uses 240V, is the standard for home use, and requires a dedicated circuit. Level 3 (DC Fast Charging) is high-voltage commercial equipment not suitable for residential installation.
Can EV charger cable be buried underground, and how deep does it need to be?
Underground runs are possible for outdoor or detached garage installations. Required burial depth varies by conduit type: 6 inches for rigid metal conduit, 18 inches for nonmetallic raceways, and 24 inches for direct burial cable. Permits and a licensed electrician inspection are required for this work.