Introduction
Installing a GFCI outlet is a manageable DIY task—if your home has modern wiring. Complexity increases dramatically in older homes, where two-wire systems, shared neutral circuits, or aluminum wiring can turn a routine swap into a hazardous situation requiring professional intervention.
A GFCI (Ground Fault Circuit Interrupter) outlet monitors current flow between hot and neutral wires. When it detects an imbalance as small as 4 to 6 milliamps—less current than it takes to power an LED nightlight—it cuts power within milliseconds. That fast response is what makes GFCI protection essential in kitchens, bathrooms, garages, and anywhere water is nearby.
This guide covers the tools required, step-by-step wiring instructions, testing procedures, and the most common mistakes that cause GFCI failures. If your Des Moines home was built before 1990, pay close attention to the older-home complications outlined below—many require a licensed electrician's assessment before work begins.
Key Takeaways
- GFCI outlets are code-required in bathrooms, kitchens, garages, outdoor areas, and basements—most homes 20+ years old need upgrades
- Confirm power is off with a non-contact voltage tester before touching any wires; the breaker alone is not enough
- Reversing LINE (incoming power) and LOAD (downstream outlets) terminals is the #1 installation mistake—identify both before wiring
- After wiring, press TEST (power should cut) then RESET (power should restore) before declaring the job complete
- Homes 30+ years old often have two-wire systems and deteriorating insulation that require a professional's assessment
How to Install a GFCI Outlet
Installation follows a defined sequence: preparation, removal, wiring, and testing. Skipping or rushing any step creates dangerous mistakes. A straightforward replacement in a modern home takes 30–60 minutes; complications in older homes can multiply that time and require professional diagnosis.
Prerequisites and Safety Considerations
Before starting, run through these three checks:
- Confirm your circuit is a standard 120V residential circuit
- Verify the electrical box has enough volume for the larger GFCI device — GFCI outlets are bulkier than standard receptacles
- Inspect wire condition for nicks, fraying, or heat damage (melted insulation, discoloration)
Non-negotiable safety requirement: Power must be verified off using a non-contact voltage tester at the outlet itself—not just at the breaker. Test between hot/neutral, hot/ground, and neutral/ground. Any reading means live wires are present and work must stop immediately.
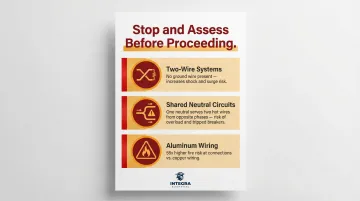
Older home complications common in Des Moines homes 30+ years old:
- Two-wire systems (no ground wire present)
- Shared neutral circuits where one neutral serves two hot wires from opposite phases
- Aluminum wiring (silver-colored conductors)—homes built 1965–1973 with aluminum wiring are 55 times more likely to reach fire hazard conditions at outlet connections than copper-wired homes
If you find any of these conditions, professional assessment is the safe call. Integra Electrical offers a complimentary Safety Evaluation for exactly these situations.
Tools and Materials Required
Essential tools:
- Non-contact voltage tester (mandatory)
- Digital multimeter
- Insulated flat-head and Phillips screwdrivers
- Wire strippers
- Needle-nose pliers
- GFCI outlet tester (plug-in device with indicator lights)
Materials needed:
- GFCI outlet (15-amp or 20-amp—match it to your circuit's breaker rating)
- Wire nuts
- Electrical tape
- Outlet cover plate
- Masking tape or labels for marking downstream outlets "GFCI Protected" per code
On a 15-amp circuit, use only a 15-amp receptacle. A 20-amp receptacle (featuring a horizontal "T-slot") must never be installed on 14 AWG wire or 15-amp circuits.
Step-by-Step: How to Install a GFCI Outlet
Installation follows a strict sequence. Shortcuts—like skipping photo documentation before disconnecting wires—consistently cause rework or dangerous wiring errors.
Step 1: Cut Power and Verify
- Turn off the correct breaker at your electrical panel
- Use your non-contact voltage tester at the outlet to confirm zero voltage
- Test between all wire pairs: hot/neutral, hot/ground, neutral/ground
- Photograph the existing outlet wiring in detail from multiple angles before disconnecting anything
This photo documentation prevents confusion during reassembly and separates clean installations from costly re-dos.
Step 2: Remove the Old Outlet
- Unscrew and remove the cover plate
- Pull the receptacle forward carefully without touching wires
- Loosen terminal screws and disconnect wires one at a time
- Immediately label incoming (LINE) wires with masking tape—these feed from the panel and connect to LINE terminals on the new GFCI
- If present, wires feeding downstream outlets connect to LOAD terminals
Step 3: Wire the GFCI Outlet
Those LINE wire labels from Step 2 matter here — the connections below depend on knowing exactly which wires came from the panel.
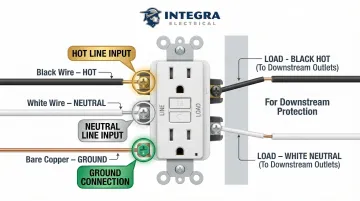
Critical wiring connections:
- Black (hot) wire → Brass LINE terminal
- White (neutral) wire → Silver LINE terminal
- Bare copper (ground) wire → Green ground screw
Strip 5/8 to 3/4 inch of insulation from each wire before connecting. Too short creates loose connections; too long leaves live copper exposed outside the terminal.
If protecting only the outlet itself (no downstream outlets), cap the LOAD terminals with wire nuts—leave them disconnected.
If protecting downstream outlets, connect the wires feeding those outlets to the LOAD terminals using the same color-coding (black to brass LOAD, white to silver LOAD).
Step 4: Secure and Mount
- Fold wires carefully into the box—never force them
- Screw the GFCI outlet into place with mounting screws
- Ensure the device sits flush against the wall
- Attach the cover plate
- Confirm no bare copper is exposed outside terminals
Step 5: Restore Power and Test Immediately
Turn the breaker back on, then press the TEST button on the GFCI face — the outlet should lose power. Press RESET to restore it. Plug in a lamp or outlet tester to confirm the outlet works, and verify any downstream outlets are also protected if you used the LOAD terminals.
Post-Installation Testing and Validation
A GFCI that looks functional can still fail to protect you. Reversed terminals or a failed internal mechanism won't show any visible sign of a problem—the outlet will have power, but it won't trip during an actual ground fault. Always test before calling the job done.
TEST/RESET Button Sequence
- Plug in a lamp or phone charger to verify the outlet has power
- Press the TEST button—you should hear a distinct click and the outlet should lose power immediately
- Confirm the plugged-in device lost power
- Press RESET to restore power
- Verify the device turns back on
If the outlet won't reset, this almost always signals reversed LINE/LOAD connections. Shut off power immediately and re-inspect before use.
The button test confirms the outlet trips and resets—but it won't catch every wiring fault. For a complete check, use a plug-in tester.
Use a GFCI Outlet Tester
A plug-in GFCI tester (available at hardware stores for $10–$15) has indicator lights that reveal wiring faults the button test alone won't catch.
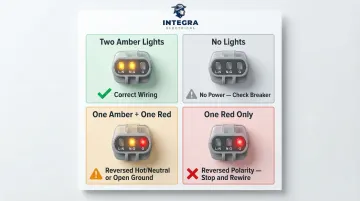
Common indicator light patterns:
- Two amber lights: Correct wiring
- No lights: No power (check breaker)
- One amber light + one red light: Reversed hot/neutral or open ground
- No amber lights + one red light: Reversed polarity — stop and rewire before use
Follow the tester's instruction card to interpret the light pattern. If any fault is indicated, shut off power and correct the wiring before use.
Common GFCI Installation Problems and Fixes
LINE and LOAD Terminal Reversal
Problem: The GFCI has power but won't reset, or resets but fails to trip during testing. Homeowners assume the device is defective and buy a replacement.
Likely cause: LINE and LOAD terminals were connected in reverse—incoming power was wired to LOAD instead of LINE. This is the single most common GFCI installation mistake.
Fix:
- Shut off power at the breaker
- Re-photograph the wiring
- Swap the connections—black hot wire to brass LINE terminal, white neutral to silver LINE terminal
- If downstream outlets exist, verify those wires go to LOAD terminals
- Re-test after correction
Modern GFCI outlets built to UL 943 standards (2006 and later) are designed to deny power entirely when miswired, preventing the installation from appearing functional when it isn't.
GFCI Won't Reset After Installation
Problem: After completing installation and restoring power, the RESET button won't stay depressed or immediately pops back out.
Likely cause: An existing ground fault somewhere in the circuit is actively triggering the protection. This could be in downstream wiring, a connected appliance, or moisture in an outlet box. The GFCI is working correctly—it's detecting a real fault.
Fix:
- Disconnect all downstream devices and outlets from the LOAD terminals
- If the GFCI resets with nothing connected, reconnect items one at a time to isolate the faulty device or wiring segment
- If it won't reset even in isolation, the wiring or box itself needs professional inspection
GFCI Nuisance Tripping After Installation
Problem: The GFCI trips repeatedly during normal use, even with ordinary appliances, causing frustration about whether the outlet is working properly.
Likely cause: In older homes, aging wire insulation allows small amounts of current leakage that a properly functioning GFCI detects and trips on. Shared neutral circuits (common in pre-1980s homes) create inherent current imbalances that cause constant tripping. Some appliances with internal ground leakage (older refrigerators, power tools) also trigger sensitive GFCI devices.
Fix:
- Test with different appliances to rule out equipment-side leakage
- If tripping persists with multiple devices, the wiring itself needs insulation resistance testing—a professional diagnostic requiring specialized equipment
- This is especially common in Des Moines homes built before 1990—if the problem persists after testing, call a licensed electrician to run insulation resistance tests
Pro Tips for Installing a GFCI Outlet Effectively
Do one outlet at a time: If replacing multiple GFCI outlets, complete and test each one fully before moving to the next. Wiring multiple outlets simultaneously increases the chance of mixing up LINE and LOAD connections across circuits.
Document before you disconnect: Take clear, well-lit photos of existing wiring from multiple angles before removing a single wire. This one habit prevents most reassembly mistakes.
Stop and call a licensed electrician if you find any of these:
- Aluminum wiring (silver-colored conductors instead of copper)
- No ground wire present in the box
- More than two sets of wires coming in
- Any signs of heat damage, scorching, or melted insulation
These conditions go beyond a standard GFCI swap. Integra Electrical handles exactly these situations for Des Moines-area homeowners — and can identify other hidden issues at the same time.
Outdoor and bathroom installations need weatherproof covers: Standard cover plates are inadequate for outdoor outlets or wet-area installations. Use "in-use" weatherproof covers that allow plugs to remain connected while maintaining moisture protection. Apply a foam gasket behind the cover plate to prevent water infiltration.
Conclusion
GFCI outlet installation quality directly determines whether the device actually protects against shock and electrocution. A visually complete installation with reversed terminals or missing ground offers false security. Preparation, correct wiring, and thorough testing are non-negotiable.
Be honest about what you find inside the box. For straightforward replacements in modern wiring, a careful DIYer can do this safely. For anything unusual—especially in older homes—the right call is professional installation from a licensed electrician who knows local code requirements and can guarantee the work. Des Moines homeowners can reach Integra Electrical at (515) 442-0025 for exactly that kind of situation.
Frequently Asked Questions
What are common GFCI installation mistakes?
The top mistakes are reversing LINE and LOAD terminals, skipping power verification with a tester, improper grounding, and not testing the outlet after installation. LINE/LOAD reversal is so common that UL updated standards in 2006 to prevent miswired devices from appearing functional.
How much does it cost to install a GFCI outlet?
Professional installation typically ranges from $130 to $300 per outlet, with a national average around $210. Older homes often have hidden wiring conditions—two-wire systems, aluminum wiring, shared neutrals—that affect final cost, so get a wiring assessment before work begins.
Are GFCI outlets required by code in kitchens and bathrooms?
Yes. The National Electrical Code requires GFCI protection in bathrooms, kitchens within 6 feet of sinks, garages, outdoor areas, and unfinished basements. Local inspectors enforce this during renovations and home sales, especially for homes built before these rules took effect—bathrooms (1975) and kitchens (1987).
What's the average lifespan of a GFCI outlet?
GFCI outlets typically last 10–15 years. Replace immediately if the TEST button no longer trips the outlet, the device shows visible damage, or it's located in a high-moisture area with frequent tripping history. Manufacturers recommend monthly testing rather than relying on a fixed chronological lifespan.
Can one GFCI outlet protect multiple outlets?
Yes. A single GFCI can protect downstream standard outlets when those outlets are wired to the LOAD terminals. Downstream outlets must be labeled "GFCI Protected" per code—a standard approach for protecting an entire bathroom or kitchen circuit with one device.
What should I do if my GFCI outlet keeps tripping?
First, unplug all devices to rule out appliance-side leakage. Check for moisture in the outlet box. If tripping continues with nothing plugged in, the problem is in the wiring itself. Degraded insulation or shared neutral circuits—both common in older homes—require a licensed electrician to diagnose properly.