Introduction
Installing an EV charger at home means adding a dedicated 240V circuit that carries a substantial continuous load for hours every night. That's not a weekend project — it requires a licensed electrician who knows NEC Article 625, understands Iowa permit requirements, and can assess whether your panel can handle the load. Mistakes in wire sizing, load calculations, or code compliance create fire hazards, failed inspections, voided warranties, and denied insurance claims.
This guide covers the full installation process: from choosing between AC and DC charger types, to panel prerequisites, step-by-step installation, and post-install validation. By the end, you'll know exactly what to expect before the first wire is pulled.
Key Takeaways
- AC Level 2 chargers are the residential standard; true DC fast chargers are impractical for homes due to commercial power requirements
- Most homes need a 240V dedicated circuit — and older panels often require an upgrade before installation can begin
- Permits are required in Des Moines — skipping them risks fines, failed home sales, and voided insurance
- Installation follows a set sequence: panel assessment, circuit work, charger mounting, wiring, and final testing
- Always hire a licensed electrician with EV experience — improper installation creates fire hazards and voids warranties
AC vs. DC Home EV Chargers: Which Type Are You Actually Installing?
When people say they're "installing a home EV charger," they almost always mean a Level 2 AC charger. Here's why the other options don't make sense for residential use.
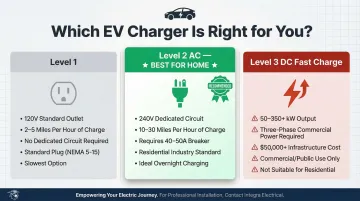
The Three Charging Levels Explained
Level 1 (Standard Outlet):
- Uses a common 120V household outlet
- Adds 2-5 miles of range per hour
- No dedicated circuit required
- Too slow for daily driving needs
Level 2 AC (Residential Standard):
- Operates on 240V electrical service (same voltage as your dryer)
- Adds 10-30 miles of range per hour
- Requires a dedicated circuit with 40A or 50A breaker
- The right choice for 95% of homeowners
Level 3 DC Fast Charging (Commercial Grade):
- Delivers 50 kW to 350+ kW directly to the battery
- Requires three-phase commercial power and significant infrastructure upgrades
- Installing a 480V transformer alone costs tens of thousands
- Not practical or cost-effective for single-family homes
What an AC Home Charger Actually Does
Your Level 2 AC charger (technically called EVSE — Electric Vehicle Supply Equipment) doesn't convert AC to DC. That job happens inside your vehicle's onboard charger.
The EVSE's role is to safely manage the flow of 240V AC power from your home panel to the car, monitoring for ground faults and ensuring a safe connection before energizing the circuit.
Typical residential units output 7.2 kW to 11.5 kW and use the SAE J1772 connector, which is the North American standard for almost all non-Tesla vehicles.
Why DC Fast Chargers Fail at Home
Installing a DC fast charger requires commercial three-phase power, transformer upgrades, and specialized infrastructure that most utility companies won't even provide for residential properties. The cost typically exceeds $50,000 before you even mount the unit.
One exception worth knowing about: bidirectional DC chargers (vehicle-to-home units) let your EV battery power your home during outages. They're still expensive, require specialized installation, and aren't widely available — but they're worth tracking if backup power is a priority.
How to Decide
86% of EV charging happens at home, not at public stations. If you drive under 200 miles per day and charge overnight, a Level 2 AC charger is the right choice. For most Des Moines homeowners, it's all the charging capacity you'll ever need — and the installation is straightforward for a licensed electrician.
Before You Install: Panel Capacity, Site Prep & Permits
Most EV charger installation problems trace back to skipping this phase. You can't just bolt a charger to the wall and hope your panel can handle it.
Electrical Panel Assessment: The 125% NEC Rule
NEC Article 625 treats EV chargers as continuous loads, which means your circuit breaker must be sized at 125% of the charger's maximum amperage. A 40A charger requires a 50A breaker. A 32A charger needs a 40A breaker.
That breaker must be a dedicated 240V double-pole breaker — meaning it takes up two adjacent slots in your panel and serves only the EV charger.
Will Your Panel Support It?
- 200A service: Usually sufficient for one Level 2 charger in most households
- 100A or 60A service: Will need an upgrade in most cases
- Heavily loaded 200A panel: May need a load management device or upgrade
The answer depends on your existing load. If you're already running electric HVAC, an electric range, a water heater, and other high-draw appliances, adding a 40A continuous load could push you over capacity.
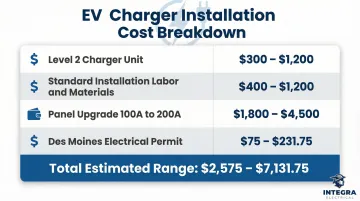
Typical Upgrade Costs
| Work Required | Cost Range (2025-2026) |
|---|---|
| Level 2 charger unit | $300 – $1,200 |
| Standard installation (labor + materials) | $400 – $1,200 |
| Panel upgrade (100A to 200A) | $1,800 – $4,500 |
| Des Moines electrical permit | $75 – $231.75 |
Distance from panel to charger location drives labor costs. A short 10-foot conduit run through a garage wall is straightforward, while a 50-foot exterior run with multiple bends adds significant time and materials to the job.
Site Readiness
Before the electrician arrives, confirm your intended mounting location meets these requirements:
- Near your parking spot (within cable reach of the charge port)
- Close to the electrical panel (to minimize conduit run)
- On a solid surface (wall stud or masonry, not drywall alone)
- At an appropriate height (42–54 inches from floor)
Outdoor installations require weather-rated enclosures and chargers with appropriate NEMA ratings for Iowa winters.
Permit Requirements Are Not Optional
Most jurisdictions require an electrical permit for EV charger installation. In Iowa, the Department of Inspections, Appeals, and Licensing (DIAL) handles electrical permitting and inspections. The City of Des Moines requires permits for this work.
Skipping permits creates three major risks:
- Fines when discovered during routine inspections or home sales
- Failed home sale inspections when buyers' lenders require proof of permitted work
- Denied insurance claims if an electrical fire occurs and the insurer discovers unpermitted work
A licensed electrician pulls the permit as part of the job, so the paperwork and inspection scheduling are handled for you.
Integra Electrical's Safety Evaluation
Getting the permit process right starts with knowing exactly what your panel can handle. Before scheduling installation, Des Moines homeowners can take advantage of Integra Electrical's complimentary Safety Evaluation. A licensed electrician assesses your panel capacity, identifies any existing electrical concerns, and confirms what work is needed — so installation day has no surprises.
Home EV Charger Installation: Step-by-Step
EV charger installation follows a defined sequence. Each step builds on the last — skipping or rushing any phase often results in failed inspections, tripped breakers, or unsafe wiring.
Preparing the Site and Planning the Circuit Run
The electrician starts by:
- Confirming the charger mounting location with the homeowner
- Measuring the conduit run from the electrical panel to the mounting point
- Identifying the most efficient routing path (through walls, along joists, or externally)
- Selecting the correct wire gauge — typically 6 AWG copper for a 50A circuit
You can't fix wire routing problems after drywall is closed — and rerouting conduit after the fact costs far more than getting it right the first time.
Running the Dedicated Circuit
NEC Article 625 requires a dedicated branch circuit for EV chargers. "Dedicated" means this circuit serves only the EV charger — it doesn't share with outlets, lights, or other appliances.
The electrician:
- Installs a new 240V double-pole breaker in the panel
- Runs conduit or cable from the panel to the charger location
- Pulls wire through the conduit (Line 1, Line 2, Ground)
- Labels the new breaker clearly in the panel directory

Mounting the Charger
The unit is secured to:
- A wall stud (for wood-framed garages)
- Solid masonry surface (for concrete or block walls)
- A backing board if the wall material won't support the weight
Recommended mounting height is 42–54 inches from floor, which meets ADA requirements and keeps the cable at a convenient height.
For outdoor installations, the charger must have an appropriate weather rating (NEMA 3R or higher) and be protected from direct exposure to rain and snow.
Wiring and Electrical Connections
All wiring is done with power OFF at the breaker.
The electrician connects power supply wires to the charger's terminal block:
- Line 1 (hot)
- Line 2 (hot)
- Ground
All connections are torqued to manufacturer specifications — loose connections create heat and fire hazards.
Plug-in vs. Hardwired:
- Plug-in (NEMA 14-50): Electrician installs the outlet, charger plugs in
- Hardwired: Cable is fed directly into the charger's wiring compartment per the wiring diagram
Post-Installation Testing and Validation
After wiring is complete:
- Restore power at the breaker and confirm the charger powers on (LED should show ready/green)
- Plug in the vehicle and confirm charging initiates
- Measure voltage at terminals with a multimeter (should read 240V ±10%)
- Check for GFCI faults and confirm no breaker trips under load
- Schedule the permit inspection to validate all work independently
The city inspector validates wire sizing, breaker sizing, grounding, and overall NEC compliance — a required step in most Des Moines area jurisdictions before the work is considered closed out.
Common EV Charger Installation Problems and Fixes
Breaker Trips When Charging Begins
Circuit breaker trips immediately or shortly after charging starts.
Why it happens:
- Undersized breaker or wire gauge for the charger's amperage draw
- Circuit isn't truly dedicated and shares load with other appliances
- Breaker wasn't sized to 125% of charger's continuous load
How to fix it:
- Verify breaker rating is 125% of charger's max amperage (50A breaker for 40A charger)
- Confirm no other loads share the circuit
- Upgrade wiring if undersized
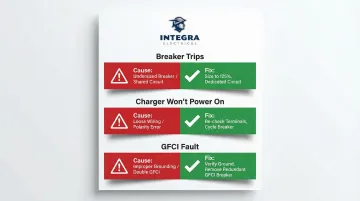
Charger Not Powering On After Installation
Charger shows no LED activity or fails to initialize after power is restored.
Why it happens:
- Wiring connections at terminal block are loose or reversed
- Breaker was not fully reset after installation
- Power supply polarity is incorrect
How to fix it:
- With power off, re-check all terminal connections for proper seating and torque
- Verify polarity (L1, L2, Ground are correctly landed)
- Cycle the breaker fully off, then back on
GFCI Fault or Error Code at Startup
Charger immediately triggers a ground fault or displays an error after install.
Why it happens:
- Improper grounding — ground wire may be missing, loose, or incorrectly landed
- Double-GFCI issue: a GFCI breaker was installed on a unit with built-in CCID protection, causing nuisance trips
How to fix it:
- Confirm the ground wire is securely seated and torqued at both the charger terminal and the panel bus bar
- If a GFCI breaker was installed unnecessarily, remove it and use a standard breaker — most chargers have internal ground-fault protection
- Consult the charger's installation manual for GFCI compatibility
Pro Tips for Getting Your EV Charger Installation Right
Go Hardwired Over Plug-In Where Possible
While NEMA 14-50 plug-in installations are easier and slightly cheaper, a hardwired installation is more permanent, slightly more efficient, and looks cleaner. It also eliminates the risk of a loose plug connection degrading over time — which matters on a circuit that runs for 8+ hours nightly.
Size Up Your Circuit for Future Needs
If your panel has capacity, install a 50A circuit even if your current charger only draws 40A. This gives you flexibility to upgrade to a higher-powered charger without redoing the circuit run — especially if you're planning to add a second EV to the household.
Don't Skip the Permit Even If It Feels Optional
In Iowa, unpermitted electrical work can complicate home sales, block insurance claims after electrical incidents, and expose homeowners to liability. A permit costs relatively little compared to the risk — and a licensed electrician handles the application as part of the job.
Work With a Local Licensed Electrician
For Des Moines Metro homeowners, working with a local licensed electrician like Integra Electrical means the installation is done right the first time — by technicians who know Iowa code requirements, backed by a 100% satisfaction guarantee and upfront pricing. No guesswork, no hidden fees.
Frequently Asked Questions
How much does it cost to install a home EV charger?
Typical residential installation costs range from $800 to $3,000, according to EnergySage, including the charger unit, labor, and permits. The biggest cost variables are distance from panel to charger location and whether a panel upgrade is needed (which adds $1,800–$4,500).
Does an EV charger require professional installation?
Yes, a licensed electrician is required — not just recommended. EV charger installation involves dedicated 240V circuit work subject to NEC code, local permits, and inspection. DIY installation typically voids manufacturer warranties and creates serious safety and insurance liability.
Does an EV charger need to be connected to the fuse box?
Yes, a Level 2 EV charger requires a dedicated double-pole 240V circuit breaker installed in the home's electrical panel. Per NEC Article 625, the circuit must be sized to 125% of the charger's continuous load amperage rating.
Is 200 amps enough for a house with an EV charger?
For most households, 200A service is sufficient for one Level 2 EV charger. However, it depends on existing electrical load — homes with electric HVAC, ranges, and water heaters may be close to capacity. An electrician should assess your panel before installation.
What voltage does a home EV charger use?
Level 2 home EV chargers operate on 208/240V AC — the same voltage as a clothes dryer or electric range, per the U.S. Department of Energy. This is why they require a dedicated 240V circuit, not a standard 120V household outlet.