Introduction
Picture this: a Des Moines homeowner pulls into the garage with a new Tesla and plugs it into the standard wall outlet, only to discover it'll take 38 hours to charge from empty. Or a weekend hobbyist unboxes a new MIG welder, plugs it in—and instantly trips the breaker. The problem isn't the equipment; it's the garage electrical system.
Most garages in Des Moines were built with nothing more than standard 120V outlets designed for power tools and shop vacs. Installing a 240V outlet is a complex electrical project. It involves panel work, permit coordination, code-compliant wiring, and precise connections inside a live panel.
Get it wrong, and you risk overloaded circuits, electrical fires, failed inspections, and voided home insurance coverage.
This guide covers what it really costs to install a 240V garage outlet in the Des Moines area, Iowa's permit requirements, and the full step-by-step installation process, including the safety checks most homeowners overlook.
Key Takeaways
- A professional 240V garage outlet installation typically costs $300–$800 in the Des Moines area
- Iowa requires a permit for new 240V circuit work—inspections are required
- Getting the wiring right means a dedicated double-pole breaker, correctly sized wire, proper grounding, and GFCI protection
- Many older Des Moines homes need a panel capacity assessment before work begins
- DIY is technically legal, but permits are required and the work will be inspected by a licensed professional
What Is a 240V Outlet and Why Does Your Garage Need One?
How 240V Power Works
Standard household outlets deliver 120 volts using a single "hot" wire, a neutral, and a ground. A 240V outlet uses two 120V hot wires that are 180 degrees out of phase with each other—when an appliance connects across both hot legs, it receives the combined 240 volts. This lets heavy-duty equipment draw more power without overloading a standard circuit.
While standard 120V circuits are rated for 15–20 amps, 240V garage circuits typically operate at 30–50 amps to support high-draw equipment.
Common Garage Equipment That Requires 240V
Most garages built before the 1990s weren't wired for 240V. Homeowners usually find out they need one when they buy:
- Level 2 EV chargers (the most common reason today)
- Welders (MIG, TIG, stick)
- Large air compressors
- Table saws and woodworking equipment
- Electric HVAC equipment
Choosing the Right Outlet: NEMA Types Explained
Each piece of equipment above may need a different outlet configuration. The NEMA (National Electrical Manufacturers Association) designation tells you the voltage, amperage, and plug configuration—so matching the right outlet to your equipment matters.
| NEMA Type | Rating | Prongs | Common Use |
|---|---|---|---|
| NEMA 14-50 | 50A, 240V | 4-prong (2 hot, 1 neutral, 1 ground) | EV chargers, electric ranges |
| NEMA 6-50 | 50A, 240V | 3-prong (2 hot, 1 ground) | Welders, plasma cutters |
| NEMA 14-30 | 30A, 240V | 4-prong (2 hot, 1 neutral, 1 ground) | Electric dryers |
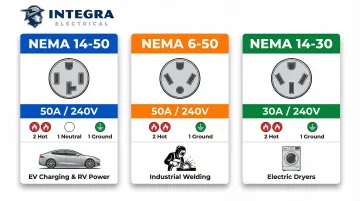
Under current NEC code, all new residential 240V installations must use 4-prong outlets. The NEC banned older 3-prong NEMA 10-series outlets—which lack a dedicated ground—from new installations in 1996.
What Does It Cost to Install a 240V Outlet in Your Garage?
Typical Installation Costs in Des Moines
For a straightforward professional installation where your panel has adequate capacity and available slots, expect to pay $300–$800 in the Des Moines metro. National cost data shows a similar range of $175–$800, with labor making up 60–70% of the total cost.
This typically includes:
- Double-pole circuit breaker
- Wire run from panel to garage
- Outlet receptacle and box
- Labor and installation
What Drives Costs Higher
- Distance from panel: A 20-foot run costs significantly less than a 60-foot run. Copper wire runs $4–$6 per linear foot for 6 AWG (50A circuits), so distance adds up fast.
- Routing complexity: Running wire through finished walls, cutting and patching drywall, or navigating fire-blocking adds labor time. Exposed runs in unfinished spaces are faster and cheaper.
- Conduit requirements: Many Des Moines jurisdictions require EMT (metal) or PVC conduit for exposed garage runs, adding both material and labor costs compared to simple NM-B cable through walls.
Panel Upgrades: The Hidden Cost
Many older Des Moines homes still have 100-amp electrical panels. Adding a 50A continuous-load circuit — like an EV charger — can push that panel past its safe capacity.
If your panel is full, outdated, or undersized, you'll need to upgrade to 200-amp service before installing the new circuit.
Panel upgrade costs: $1,200–$3,000, depending on whether the utility requires a new meter base and the age of your home's wiring.
FPE and Zinsco Panels: Federal Pacific Electric (Stab-Lok) and Zinsco panels are notorious fire hazards: their breakers fail to trip and bus bars corrode over time. Polk County explicitly requires FPE panels to be replaced during service updates. If you have one, budget for a full replacement.
Material Cost Breakdown
| Component | Typical Cost | Notes |
|---|---|---|
| NEMA 14-50 outlet | $10–$90 | Standard residential-grade outlets cost $10–$20; industrial/EV-rated outlets cost $50–$90+ |
| 50A double-pole breaker | $20–$160 | Standard breakers cost ~$20; NEC-required GFCI breakers cost $90–$160 |
| 6 AWG copper wire | $4–$6/ft | Required for 50A circuits; distance dictates total cost |
| Conduit (if required) | Varies | EMT or PVC; adds labor for installation |
| Junction box | $10–$30 | Metal or plastic depending on code |
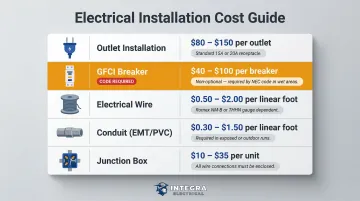
One line item worth calling out: the GFCI breaker cost isn't optional. Under the 2020 and 2023 National Electrical Code (NEC), all 125V–250V garage receptacles must have GFCI protection. It's a safety mandate, so build it into your budget from the start.
Integra Electrical walks Des Moines homeowners through exactly these line items before any work begins — so there are no surprises when the job is done.
Permits, Prerequisites, and Safety Checks Before You Start
Iowa Permit Requirements
In Iowa—including Marion County and all Des Moines metro communities—a permit is required for new 240V circuit installations. Pulling a permit requires an inspection that verifies your wiring, breaker sizing, grounding, and code compliance—protecting you and future buyers.
Permit fees:
- City of Des Moines: $77.25 base fee for residential electrical alterations
- Polk County (unincorporated): $44 base fee plus $5.50 per circuit
Why skipping the permit is a terrible idea:
- Failed home inspections during resale
- Insurance claims denied due to unpermitted electrical work
- Costly rework to bring installation up to code
- Potential fines from the local building authority
Iowa has adopted the 2023 NEC, effective July 1, 2025 for new permits. Permits purchased before that date follow the 2020 NEC.
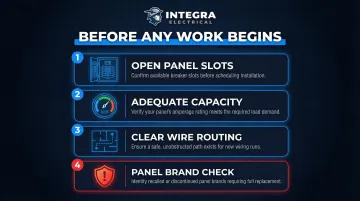
Prerequisites: What Your Panel Must Have
Once you've confirmed a permit is required, verify these four things before any work begins—or before calling an electrician for a quote:
- Two adjacent open slots — A 240V circuit needs a double-pole breaker occupying two side-by-side slots. A full panel means a panel upgrade or a tandem breaker solution (not always code-compliant).
- Adequate panel capacity — Adding a 50A circuit to a 100A panel already running HVAC, appliances, and lighting can exceed safe load. An electrician should calculate your total draw before proceeding.
- Clear wire routing to the garage — Map the path from your panel. Finished walls, insulation batts, and fire-blocking can all require cutting, drilling, or conduit that adds time and cost.
- Panel brand check — Federal Pacific, Zinsco, and most pre-1980s panels are fire hazards and uninsurable in many cases. These need replacement before any new circuits are added.
Non-Negotiable Safety Requirements
Before touching any wiring:
- Shut off the main breaker and verify with a non-contact voltage tester
- Wear insulated gloves and safety glasses
- Never work inside a live panel
One hazard catches even experienced DIYers off guard. Even with the main breaker off, the service entrance conductors—the thick wires feeding your panel from the meter—remain fully energized and lethal. These lines carry 240V directly from the utility and cannot be de-energized without the utility company disconnecting service at the meter.
How to Install a 240V Outlet in Your Garage: Step-by-Step
The installation follows a defined sequence: plan the circuit, run the wire, install the breaker, wire the outlet, then test. Shortcuts at any stage cause delayed failures, failed inspections, or fire hazards.
Step 1: Plan the Circuit and Choose Your Components
Determine amperage requirements:
Check the nameplate on your appliance. Most Level 2 EV chargers require a 50A dedicated circuit; welders typically need 30–50A.
Select matching components:
- 50A circuit: 50A double-pole GFCI breaker + NEMA 14-50 outlet + 6 AWG copper wire
- 30A circuit: 30A double-pole GFCI breaker + NEMA 14-30 or 6-30 outlet + 10 AWG copper wire
50A breakers require 6 AWG copper minimum:
Using undersized wire is a leading cause of electrical fires. NEC 334.80 restricts NM-B (Romex) cable to the 60°C ampacity column. For a 50A breaker using NM-B cable, you must use 6 AWG copper — not 8 AWG.
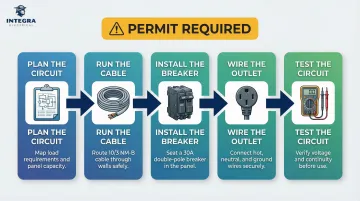
Step 2: Run the Cable from Panel to Garage
Shut off main power and verify the circuit is dead with a voltage tester before touching anything. Then identify the most direct route from the panel to the outlet location and run cable through walls, attic, or basement as needed.
Physical protection:
When drilling holes through studs, NEC 300.4 requires holes to be at least 1¼ inches from the nearest edge of the wood. If you can't maintain this clearance, install steel nail plates (at least 1/16-inch thick) to protect the cable from drywall screws.
Conduit requirements:
Many Des Moines area municipalities require EMT (metal) or PVC conduit for exposed garage runs. Install conduit first, then pull wire through.
Step 3: Install the Double-Pole Breaker
With power confirmed off, install the double-pole GFCI breaker into two adjacent panel slots.
Wiring connections:
- Black and red (hot) wires → Breaker terminals
- White (neutral) wire → Neutral bus bar
- Bare copper (ground) wire → Ground bus bar
Torque specifications matter:
NEC 110.14(D) requires connections to be tightened to manufacturer-specified torque values using a calibrated torque screwdriver. "Hand-tight" is a code violation, and a fire hazard. Loose connections inside a panel are a primary cause of electrical fires.
Step 4: Wire and Mount the Outlet
At the outlet location, pull approximately 8 inches of cable through the mounted electrical box. Strip insulation carefully.
Wiring connections:
- Black and red wires → Hot terminals (brass)
- White wire → Neutral terminal (silver)
- Bare copper wire → Ground screw (green)
Secure the receptacle in the box, ensure it sits level, and attach the cover plate.
4-prong requirement: All new residential 240V installations must use 4-prong outlets (NEMA 14-series) to comply with current NEC standards.
Step 5: Test Before Putting Into Service
Restore power and use a multimeter to verify voltage:
- 240V between the two hot terminals
- 120V between each hot terminal and neutral/ground
If using a GFCI breaker (required for garage installations), press the Test button to confirm it trips correctly.
A passing voltage test and a tripping GFCI confirm the circuit is wired correctly. If either check fails, shut power off immediately and recheck every connection before proceeding.
Common Problems and When to Call a Licensed Electrician
Most installation failures don't come from the visible steps—they come from hidden errors in sizing, grounding, or panel connections that only surface later.
Breaker Keeps Tripping After Installation
Problem: The new breaker trips immediately or when the appliance is first used.
Likely causes:
- Wire gauge is undersized for the amperage
- Loose or crossed connections at the breaker or outlet
- Short circuit in the wire run
Fix: Shut off power immediately. Verify wire gauge matches the breaker rating. Re-inspect all terminal connections for tightness and correct wiring order. Do not simply reset and continue—a repeatedly tripping breaker signals an active hazard.
Outlet Delivers Incorrect Voltage
Problem: Multimeter reads below 200V or shows an imbalanced reading (e.g., 120V across both hot legs instead of 240V).
Likely causes:
- One hot wire is not properly seated on the breaker
- The double-pole breaker is not making contact with both bus bar legs
- Faulty breaker
Fix: With power fully off, verify that both hot wires are firmly seated on the breaker terminals and that the breaker is snapped into both bus bar slots.
When to Stop and Call a Licensed Electrician
Some problems go beyond what a careful DIYer can safely resolve. If any of the following apply, stop work and bring in a licensed electrician.
Stop immediately and contact a professional if:
- Your panel is full, outdated, or has no open slots
- Your home uses aluminum conductors or knob-and-tube wiring
- Your panel is Federal Pacific, Zinsco, or another problematic brand
- There is no grounding system present
- You are not confident at any stage of the process
Des Moines homeowners dealing with any of these situations can contact Integra Electrical. They specialize in older homes where these complications are most common — assessing panel capacity, handling permits, and working through the problems that make a straightforward DIY job genuinely dangerous.
Frequently Asked Questions
How much does it cost to install a 240V outlet in a garage?
Expect to pay $300–$800 for a professional installation in the Des Moines area, with labor making up 60–70% of the cost. If your panel requires an upgrade to 200 amps, add $1,200–$3,000 to the total project cost.
How much does it cost to install a 240V outlet for an EV?
EV charger installations follow the same 240V outlet process and typically require a 50A dedicated circuit, so costs are similar: $300–$800 unless a panel upgrade is needed. Utility rebates or IRS tax credits may offset costs — the federal 30C credit is now restricted to eligible low-income or non-urban census tracts, so check eligibility before counting on it.
Do you need an electrician to install a 240V outlet?
While DIY is technically legal in Iowa, a 240V installation requires working inside the electrical panel, which carries serious shock risk. Most localities require a permit and inspection, which effectively mandates licensed work. Skipping a professional creates liability, safety hazards, and potential insurance issues.
Do you need a double-pole breaker for a 240V outlet?
Yes. A 240V circuit draws from both hot legs in the panel simultaneously, requiring a double-pole breaker that occupies two adjacent slots — a standard single-pole breaker only delivers 120V.
Do garages usually have a 240V outlet?
Most garages—especially in homes built before the 1990s—were not originally wired with 240V outlets. They typically have standard 120V outlets only, so homeowners must install one as a new dedicated circuit if they need to run an EV charger, welder, or other high-draw equipment.
Need a 240V garage outlet installed the right way? Integra Electrical serves Des Moines, West Des Moines, Indianola, Norwalk, Johnston, Polk City, and the surrounding metro area. Contact us at (515) 442-0025 or visit www.integraelectrical.co to schedule a complimentary safety evaluation and get upfront, transparent pricing before any work begins.