Introduction
Maybe a bathroom outlet keeps tripping, a home inspector flagged your kitchen wiring, or you just want to bring an older home up to code. Whatever brought you here, replacing a regular outlet with a GFCI is within reach for homeowners comfortable with basic electrical work—but it's not a job to rush.
Working on live wiring without verifying power is off, encountering aluminum conductors in a 1970s home, or finding only two wires instead of three can turn a straightforward weekend project into a serious hazard.
This guide is written for homeowners with some DIY experience who want clear, step-by-step instructions. If your home is 30 years or older, understand that unexpected conditions—undersized boxes, missing ground wires, or non-standard wiring—may change the equation entirely and require a licensed electrician.
For those who are ready to proceed, this guide covers the complete process from shutting off power through final testing—including what to watch for when things don't go as expected.
Key Takeaways
- GFCI outlets are NEC code-required in bathrooms, kitchens, garages, basements, and outdoor areas—upgrade any standard outlets in these locations
- Installation takes 30–60 minutes: turn off power, swap the outlet, wire LINE and LOAD terminals correctly, then test
- Correctly wiring LINE (incoming power) vs. LOAD (downstream outlets) is the most common mistake—reversing them means the GFCI won't protect anything
- Before starting, check for aluminum wiring, missing ground wires, or undersized boxes—any of these conditions require a licensed electrician
- Always use a non-contact voltage tester to confirm power is off—no exceptions
What You Need Before You Start
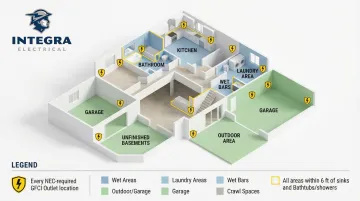
NEC Requirements for GFCI Placement
The 2023 National Electrical Code (NEC), adopted by Iowa effective July 2025, expanded GFCI protection requirements for residential outlets. If you own an older Des Moines home with standard outlets in any of these locations, they should be upgraded:
- Bathrooms
- Kitchens (all 125V–250V receptacles, not just countertop areas)
- Garages and accessory buildings at or below grade
- Outdoor receptacles
- Basements (both finished and unfinished)
- Within 6 feet of any sink
- Laundry areas
- Crawl spaces at or below grade
- Bathtubs or shower stalls (within 6 feet)
Homes built before these code updates were often never upgraded — which means your 1980s ranch might still have unprotected standard outlets in every one of those locations. Before you buy a GFCI outlet, gather the right tools so the job goes smoothly.
Tools and Materials
Essential Tools:
- Non-contact voltage tester
- Outlet tester (3-prong plug-in type)
- Flat-head and Phillips screwdrivers
- Needle-nose pliers
- Wire stripper
- Masking tape and marker for labeling wires
Materials:
- GFCI outlet (15A or 20A matched to your circuit breaker rating)
- Electrical tape
- Wire nuts (if needed for connections)
Critical Detail: The GFCI outlet's amperage rating must match your circuit breaker. Installing a 20A GFCI on a 15A circuit is a code violation—the T-slot configuration allows users to plug in 20-amp appliances, which can overload the 14 AWG wiring and create a fire hazard before the 15A breaker trips.
Safety Non-Negotiables
Stop immediately and call a licensed electrician if you find any of these three conditions:
1. Aluminum Wiring Instead of Copper
Silver-colored wire instead of copper indicates aluminum branch-circuit wiring, common in homes built between 1965 and the mid-1970s. According to the U.S. Consumer Product Safety Commission, aluminum wire connections are 55 times more likely to reach fire hazard conditions than copper.
Standard twist-on wire nuts or CO/ALR devices are not CPSC-approved permanent repairs. Only complete replacement with copper cable, COPALUM crimp connectors, or AlumiConn setscrew connectors are acceptable solutions.
2. No Ground Wire Present
If the box contains only two wires—black (hot) and white (neutral)—with no bare copper or green ground wire, you're working with a two-wire system common in pre-1960s homes. While GFCI installation is technically permitted on two-wire circuits, the outlet must be labeled "No Equipment Ground" and installation requires careful attention to code requirements covered later in this guide.
3. Electrical Box Too Small for GFCI
GFCI receptacles are physically larger than standard outlets. If the existing box is crowded, adding a GFCI may violate NEC box fill calculations (the code limit on how many wires and devices can fit in one box). A cramped installation can damage wires, create hot spots, or prevent the outlet from seating properly.
How to Replace a Regular Outlet with a GFCI: Step-by-Step
Each step below builds on the last. Power verification and wire labeling are the two most skipped steps — and the two most likely to cause problems if you skip them.
Step 1: Shut Off Power and Verify
- Locate the correct circuit breaker for the outlet
- Switch it to the OFF position
- Tape the breaker handle so no one accidentally resets it
- Use a non-contact voltage tester at the outlet faceplate to confirm zero power
- As a secondary check, plug a lamp into the outlet—it should not turn on
Why both tests? Some homes have outlets wired to multiple circuits. The lamp confirms the specific outlet has no power, while the voltage tester can detect voltage on wires inside the box.
Step 2: Remove the Old Outlet and Label the Wires
- Unscrew and remove the faceplate
- Remove the two mounting screws holding the outlet to the box
- Pull the outlet out without touching bare wire ends
- Before disconnecting anything, use masking tape and marker to label each wire:
- "Black Line" or "Hot In"
- "White Line" or "Neutral In"
- "Black Load" (if present)
- "White Load" (if present)
- "Ground"
GFCI terminals are arranged differently than a standard outlet, so labeled wires eliminate any guesswork during reconnection.
Step 3: Inspect the Box and Wiring
Check for these conditions:
- Wire condition: Look for fraying, damaged insulation, or discoloration
- Wire color: Silver-colored wire indicates aluminum (stop and call an electrician)
- Box capacity: The box should have adequate space for the GFCI body and wire connections
Box Fill Calculation (Quick Reference):
If the box looks crowded, confirm it can legally fit the GFCI. Count all wires entering the box and multiply by the gauge factor:
- 14 AWG wire = 2.00 cubic inches per wire
- 12 AWG wire = 2.25 cubic inches per wire
- Device yoke (the outlet itself) = double the volume of the largest wire
Add these together. If the total exceeds your box's rated volume (stamped inside the box), the box is too small.
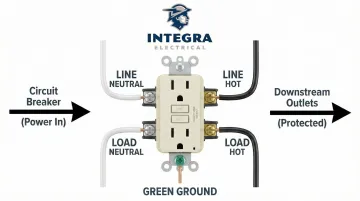
Step 4: Connect the LINE Wires
The LINE terminals connect to incoming power from the circuit breaker. These are always connected first.
- Disconnect the old outlet's wires one at a time
- Connect the black (hot) wire to the brass LINE terminal
- Connect the white (neutral) wire to the silver LINE terminal
- Tighten terminal screws firmly
- Give each wire a gentle tug to confirm it's seated properly
Critical: If LINE and LOAD wires are reversed, the GFCI won't trip during a fault — defeating the entire purpose of the upgrade.
Step 5: Connect the LOAD Wires and Ground
If your box has a second set of wires going to downstream outlets:
- Connect the black load wire to the brass LOAD terminal
- Connect the white load wire to the silver LOAD terminal
- Wrap the bare copper ground wire around the green grounding screw and tighten securely
- Wrap all terminal connections with electrical tape for added security
If you have only one set of wires (one black, one white, one ground), skip the LOAD connections—leave those terminals covered with the factory tape. This is a valid, correct installation.
Step 6: Seat the Outlet and Test
- Fold wires into the box using needle-nose pliers
- Push the GFCI outlet into the box
- Tighten mounting screws so the outlet sits level and flush
- Attach the faceplate
- Restore power at the breaker
- Press the TEST button—power to the outlet should cut off immediately
- Plug in an outlet tester—it should show no power
- Press RESET to restore power
- Verify the outlet tester shows correct wiring (typically three lights)
- Apply "GFCI Protected" label stickers to any downstream outlets this device protects
Line vs. Load: Understanding GFCI Terminal Connections
What LINE Means
LINE terminals connect to the wires bringing power from the circuit breaker—the power source side. These are the only terminals that must be connected for the GFCI to function and provide protection at that single outlet.
No LINE connection means no power and no protection. Get these right first.
What LOAD Means
LOAD terminals connect to wires that carry power forward to the next outlet or outlets further along the circuit. Connecting wires here extends GFCI protection to all downstream outlets, meaning one GFCI can protect multiple receptacles on the same circuit.
LOAD wiring is optional—only use it when the box contains a second set of wires leading to additional outlets.
Quick reference:
| Terminal | Wire source | Required? |
|---|---|---|
| LINE | From circuit breaker (power in) | Always |
| LOAD | To downstream outlets (power out) | Only if second wire set present |
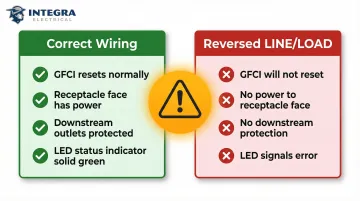
What Happens When LINE and LOAD Are Reversed
Modern GFCI receptacles feature UL 943-required reverse line-load miswire lockout protection. If you reverse the terminals:
- The GFCI will not reset
- The device will not provide power to the receptacle face
- The device will not provide power to downstream outlets
- The status indicator LED will signal an error (off or flashing red)
This built-in fail-safe prevents the most common wiring error. If the RESET button won't stay engaged after installation, check your LINE/LOAD connections first.
Single Set of Wires: LINE Only
If there's only one black wire, one white wire, and one ground wire in the box, connect only the LINE terminals. Leave the LOAD terminals covered with factory tape. It's a valid installation that protects the outlet where the GFCI is installed.
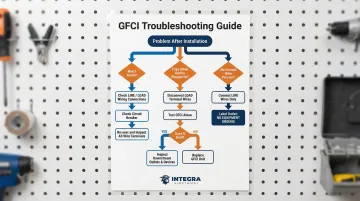
Common GFCI Installation Problems and How to Fix Them
GFCI Won't Reset After Installation
Problem: After restoring power, the RESET button won't stay engaged or immediately pops back out.
Likely Causes & Fixes:
- LINE and LOAD reversed: The most common culprit. Verify your labeled wires are connected to the correct terminals.
- Loose wire connections: Check that all wires are firmly seated with no loose strands touching adjacent terminals.
- Circuit breaker not fully on: Verify the breaker is completely switched to the ON position.
Outlet Has Power but Trips Immediately When Anything Is Plugged In
Problem: The GFCI resets successfully but trips the moment a device is plugged in, even a simple lamp.
Likely Causes & Fixes:
The issue is almost always downstream—a faulty device, damaged wire, or bad connection at another outlet. Isolate it by:
- Turn off power at the breaker
- Disconnect the LOAD wires from the GFCI (if connected)
- Cap the load wires with wire nuts
- Restore power and test the GFCI alone
- Resets and holds: The problem is downstream — inspect devices and wiring beyond this outlet.
- Still trips: The GFCI itself may be defective, or there's an issue with the LINE wiring.
No Ground Wire in the Box
Problem: The electrical box contains only two wires—black and white—with no bare copper or green ground wire.
Solution: NEC 406.4(D)(2) permits GFCI installation on two-wire circuits without an equipment ground. Connect only the LINE terminals (black to brass LINE, white to silver LINE). Label the outlet "No Equipment Ground" using the sticker included in the box. The device still provides shock protection, even without a ground wire.
If a specific appliance requires a grounded outlet, you'll need to call a licensed electrician to run new three-wire cable.
Pro Tips for a Successful GFCI Upgrade
Never Rely on Visual Checks Alone
Always test with a non-contact voltage tester directly at the outlet and at the wires inside the box. Some homes have outlets wired to multiple circuits—turning off one breaker may not cut all power to that box.
Take a Photo Before Disconnecting Anything
When replacing outlets in an older Des Moines home, photograph the existing wiring before you disconnect. This creates a reference point that wire labels alone can't replicate, especially when wire colors have faded or don't follow modern conventions.
If the existing wiring looks unusual, corroded, or uses unfamiliar materials, stop and call a licensed electrician. Integra Electrical's complimentary Safety Evaluation is built for exactly these moments: a licensed technician assesses what's inside the walls before any work begins. That's especially valuable in homes 30 years and older, where hidden wiring issues are common.
Test Monthly After Installation
Press the TEST button monthly to confirm power cuts off, then press RESET. That's the only way to confirm the protection is still working.
Frequently Asked Questions
How much does an electrician charge to replace a regular outlet with a GFCI?
Professional GFCI installation typically ranges from $130–$300 per outlet, with an average cost of $210 including labor and materials. DIY material cost is limited to the outlet itself, which ranges from $7–$15 for a standard 15A or 20A GFCI.
Do I need an electrician to replace a regular outlet with a GFCI?
Most homeowners can handle a straightforward swap when the wiring is copper, the box has adequate space, and a ground wire is present. Aluminum wiring, two-wire systems without ground, or unfamiliar wiring configurations all call for a licensed electrician.
What happens if I install a 20-amp GFCI outlet on a 15-amp circuit?
A 20-amp GFCI on a 15-amp circuit won't create an immediate safety hazard but is a code violation. Outlet amperage must match the circuit breaker rating. A 15-amp circuit requires a 15-amp GFCI outlet to prevent users from plugging in 20-amp appliances that can overload the wiring.
What are common GFCI installation mistakes to avoid?
The most common mistakes are:
- Reversing LINE and LOAD terminals
- Failing to verify power is off before working
- Not labeling wires before disconnecting the old outlet
- Using a GFCI rated for the wrong amperage
Always double-check terminal connections and test the device before closing up the box.
What should not be plugged into a GFCI outlet?
Appliances with motors or compressors—like refrigerators, freezers, and sump pumps—can cause nuisance tripping on GFCI outlets because normal startup surges mimic a ground fault. These should remain on standard outlets unless code specifically requires GFCI protection in that location.
Is there a difference between a GFI and a GFCI outlet?
GFI (Ground Fault Interrupter) and GFCI (Ground Fault Circuit Interrupter) refer to the exact same device. GFI is an older, informal abbreviation for the same thing. The NEC and UL standards exclusively use "GFCI," but both terms are used interchangeably in the field.