Introduction
You're sitting in your Des Moines living room when the lights flicker for the third time this week. Or maybe you've noticed a wall outlet that feels warm to the touch, or a breaker that trips whenever you run the dishwasher and microwave at the same time. It's easy to dismiss these symptoms as minor quirks—until they're not.
Electrical problems rarely announce themselves clearly. They hide behind walls, inside panels, and within connections you can't see. According to the National Fire Protection Association (NFPA), electrical failures or malfunctions caused an average of 31,647 home fires annually between 2019 and 2023, resulting in $1.6 billion in property damage, 425 deaths, and 1,279 injuries each year. A professional electrical safety inspection is the only way to know for certain what's happening behind your walls.
This guide walks you through everything you need to understand about electrical safety inspections: what they are, what happens during one, what inspectors look for, the warning signs that demand immediate action, and how to prepare.
Key Takeaways
- Electrical safety inspections examine your home's wiring, outlets, panel, and circuits to confirm everything is safe and code-compliant
- Home electrical failures cause over 31,000 U.S. fires annually, making routine inspections critical for prevention
- Homes 25+ years old should be inspected every 2-3 years; most other homes every 3-5 years
- Inspections include visual examination, live and dead circuit testing, and a prioritized written report
- Warning signs like flickering lights, warm outlets, or frequent breaker trips require immediate inspection
What Is an Electrical Safety Inspection and Why Does It Matter?
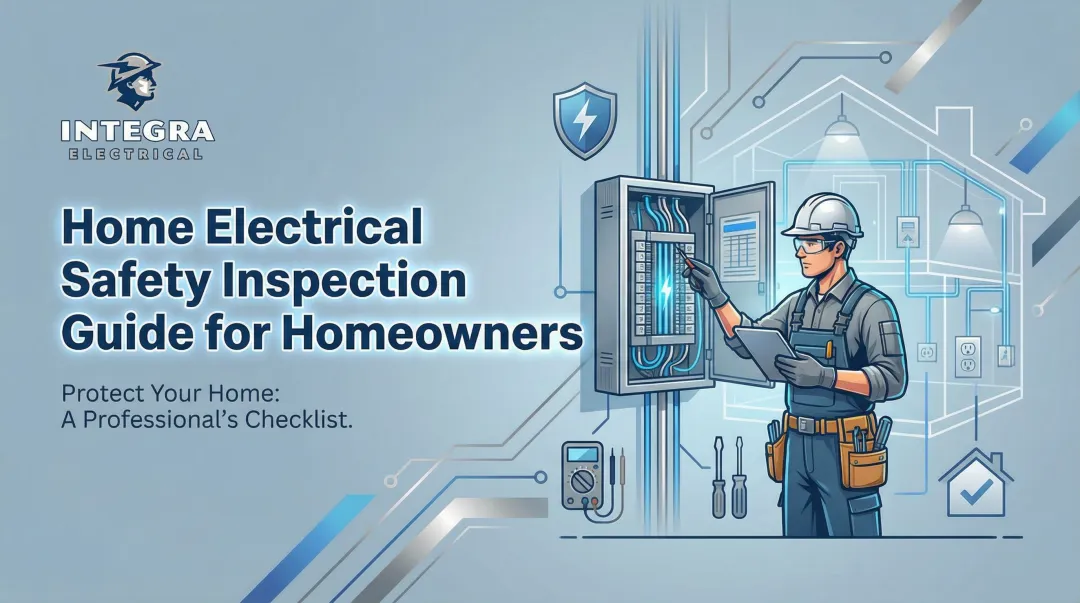
An electrical safety inspection is a thorough review of your home's fixed electrical system—wiring, outlets, switches, circuit breakers, and the electrical panel—conducted by a licensed electrician. The goal is straightforward: confirm everything is safe, working properly, and up to current code.
Why Routine Inspections Matter Beyond Emergencies
Electrical systems degrade silently. Heat, age, moisture, and increased appliance loads all take their toll. The physics are straightforward: when components age or circuits become overloaded, systems overheat, insulation wears out, and dangerous arcing or short circuits occur. Short circuits from defective and worn insulation caused 14% of civilian home fire deaths.
Nearly half of all U.S. housing stock—approximately 63.3 million occupied homes—was built in 1979 or earlier, meaning these electrical systems are operating at 45+ years old. Most were never designed for today's electrical demands.
How Often Should You Schedule an Inspection?
Standard guideline:
- Every 3-5 years for most homes
- Every 2-3 years for homes 25 years old or older
Homes 30+ years old face the steepest risk. Their wiring and panels were built for a fraction of today's electrical load. EV chargers, multi-zone HVAC, home offices, and high-draw kitchen appliances all push older systems well past what they were designed to handle.
When an Inspection Is Non-Negotiable
Certain situations demand an immediate inspection:
- Buying or selling a home
- After a major renovation or addition
- After storm damage or power surges
- When unexplained electrical symptoms appear
Some insurers also require documentation of a recent inspection before renewing coverage on older homes — and without it, a fire-related claim can be denied outright.
What Happens During an Electrical Safety Inspection?
A professional electrical safety inspection follows a structured three-phase approach: visual examination, physical and instrument-based testing, and a written report with recommendations. No repairs are performed during the inspection itself. Findings are documented first so you can review them and decide on next steps.
Phase 1: Visual Inspection
The electrician examines all accessible electrical components: exposed wiring, outlets, switches, the electrical panel, and junction boxes. They look for visible damage, improper installations, missing covers, corrosion, or burn marks.
A trained eye catches things most homeowners miss. Slightly discolored panel connections can signal overheating. Improperly sized wire gauges or outdated wiring methods are easy to overlook without the right training.
Phase 2: Testing—Dead and Live Tests Explained
Testing falls into two categories:
Dead tests are conducted with circuits de-energized. These check:
- Insulation integrity
- Wire continuity
- Proper grounding paths
Live tests are performed with power on. These verify:
- GFCI outlets respond correctly to ground faults
- AFCI breakers detect arc faults
- Circuit breakers trip at the correct amperage
- Voltage levels are within acceptable ranges
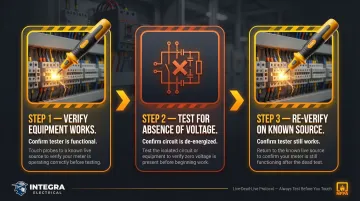
NFPA 70E Article 120.5(7) mandates the "Live-Dead-Live" testing protocol: electricians confirm their equipment works on a known voltage source, test the circuit for absence of voltage, then re-verify on the known source again. This sequence confirms both the absence of voltage and the reliability of the test equipment itself.
Phase 3: The Inspection Report
At the end, the electrician provides a written summary categorizing findings by urgency. Industry standards typically use three categories:
| Category | Description | Action Required |
|---|---|---|
| Immediate | Danger present; creates fire or shock risk | Repair within days |
| Near-Term | Potential danger; likely to worsen | Repair within weeks to months |
| Recommended | Improvement or upgrade | Plan for future |
What to do with your report:
- Address immediate findings first—these are safety hazards
- Create a timeline for near-term repairs
- Budget for recommended upgrades over the next 1-2 years
Integra Electrical's Approach for Des Moines Homeowners
That report is only useful if the inspection itself is thorough—which is why Integra Electrical starts every visit with a complimentary Safety Evaluation before any work begins. Using a Digital Voltage Analyzer, technicians detect overloaded circuits and hidden risks that a standard visual check won't catch. In older Des Moines homes, where wiring from the 1960s or 1970s may still be in service, this step routinely surfaces problems that would otherwise go unnoticed until something fails.
What Do Electrical Inspectors Check For in Your Home?
Inspectors work through five critical areas during a safety inspection. Each one targets a common failure point — and in older homes, multiple issues often show up at once.
Electrical Panel and Circuit Breakers
Inspectors verify:
- Panel is properly sized for your home's current electrical load
- No double-tapped breakers (two wires on one breaker terminal)
- No signs of overheating, corrosion, or burn marks
- Correct circuit labeling
Older homes with fuse boxes or panels from the 1960s-1980s often require upgrades. Federal Pacific Electric (Stab-Lok) and Zinsco panels have documented reliability issues. CPSC testing found that 85% of FPE double-pole breakers and 39% of single-pole breakers failed UL test criteria, with some jamming and failing to trip under any overcurrent condition.
Wiring Condition and Type
Inspectors confirm:
- Wire gauge matches circuit amperage
- Cables are properly anchored and clamped
- No frayed, exposed, or improperly spliced wiring
Specific risk factors in older homes:
- Aluminum wiring: Homes built before 1972 with aluminum branch-circuit wiring are 55 times more likely to have wire connections reach "Fire Hazard Conditions" than copper-wired homes
- Knob-and-tube wiring: NEC 394.12 prohibits knob-and-tube wiring in insulated spaces — the insulation traps heat the wiring was never designed to dissipate, creating a fire risk under modern electrical loads
Outlets and Switches
Inspectors verify:
- All outlets are properly grounded (three-prong)
- GFCI protection in kitchens, bathrooms, garages, and outdoor areas
- AFCI breakers protect bedroom and living area circuits
Ungrounded two-prong outlets are a common failure point in homes built before the 1970s. These lack the grounded pathway that diverts fault current to ground, creating shock and fire risks.
Electrical Boxes and Installation Quality
Boxes must be:
- Correctly sized for the number of conductors
- Flush with wall surfaces
- Free of exposed wires
- Covered and accessible (not buried behind drywall)
Common Issues That Fail an Inspection
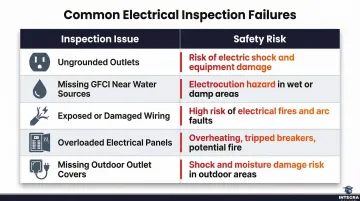
| Issue | Safety Risk |
|---|---|
| Ungrounded outlets | No path for fault current; increased shock and fire risk |
| Missing GFCI protection near water | Electrocution hazard in wet locations |
| Exposed or improperly connected wiring | Direct shock hazard and arc flash risk |
| Overloaded panels | Overheating, breaker failure, and potential fire |
| Missing outdoor outlet covers | Moisture intrusion leading to shorts and corrosion |
Warning Signs Your Home Needs an Electrical Inspection Soon
The NFPA and U.S. Fire Administration explicitly link several homeowner-observed symptoms to severe underlying electrical hazards that call for an immediate call to a licensed electrician.
Red Flags You Should Never Ignore
- Breakers tripping repeatedly — Circuits are overloaded or a device is failing. Breakers trip to prevent wires from overheating; if it keeps happening, the system is being pushed past safe limits.
- Lights flickering when appliances kick on — Usually points to loose connections or an undersized circuit. Loose connections create arcing, which generates heat that can ignite surrounding materials.
- Warm outlets or switch plates — A sign of overheating connections or overloaded circuits. Heat breaks down insulation over time and significantly raises fire risk.
- Burning smell near outlets or panels — Indicates melting insulation or overheating wiring. Shut off the affected circuit immediately and call an electrician.
- Scorch marks around outlets — Evidence that arcing or a short circuit has already occurred. These don't self-correct and will worsen without repair.
Elevated Risk for Older Des Moines Homes
These warning signs are especially serious in older homes. Homes built in the 1950s through 1990s often feature:
- Outdated wiring systems (aluminum, knob-and-tube)
- Undersized panels (60-100 amp service vs. today's 200-amp standard)
- Receptacles never upgraded to grounded outlets
- Wiring not designed for modern appliance loads
If your home is in this age range, treat any of the above warning signs as a prompt for immediate inspection rather than a wait-and-see situation.
Rising Energy Bills as a Subtler Warning Sign
An unexplained spike in electricity costs can signal an inefficient or overloaded system. On its own it's not conclusive, but paired with any of the symptoms above, it's a clear reason to schedule a professional inspection.
How to Prepare for Your Electrical Safety Inspection
A little prep work on your end means the electrician can move faster and catch more — here's what to have ready.
Before the Electrician Arrives
Make these areas accessible:
- All electrical panels and sub-panels (remove shelving or stored items blocking them)
- Outlets and switches in all rooms (clear furniture and storage)
- Attic or basement access points (where wiring is present)
Gather previous documentation:
- Any previous inspection reports
- Records of electrical work performed
- Age of the home if known
What to Have Ready During the Inspection
Prepare a written list of:
- Any electrical symptoms you've noticed (and when they occur)
- Past DIY electrical work done on the home
- Recent appliance additions or changes in electrical usage
What to Expect on Inspection Day
The electrician may need to briefly turn off power to certain circuits during testing. Keep these in mind when scheduling:
- Avoid critical work-from-home days when a brief outage would be disruptive
- Have a backup plan for essential devices (medical equipment, security systems)
- Budget 2-4 hours for most single-family homes
The inspection is non-invasive: no walls are opened and no major disruption occurs. The electrician will remove panel covers to check internal components, then restore everything before leaving.
Frequently Asked Questions
How much does an electrical safety inspection typically cost?
In the U.S., electrical safety inspections typically range from $100 to $200, with more advanced diagnostics such as infrared thermal inspections costing $150–$350. Either option is a fraction of what emergency repairs or fire damage typically run.
What happens during an electrical safety inspection?
The inspection follows three phases: a visual examination of all accessible components, instrument-based testing (both dead and live circuit tests), and a written findings report with prioritized recommendations based on urgency.
What mandatory tests are included in an electrical safety inspection?
Key tests include continuity testing to verify wire connections, insulation resistance checks, GFCI and AFCI functionality verification, polarity testing to ensure correct wiring, and circuit breaker response testing. All testing is performed by a licensed electrician.
How long does an electrical safety inspection take?
Duration depends on home size and circuit count; most thorough inspections take 1–2 hours, though larger or more complex homes can take 2–4 hours. That's considerably more thorough than the quick visual check included in a standard home inspection.
Can any licensed electrician perform an electrical safety inspection?
Technically, yes — but look for one with specific experience in residential safety inspections. In the Des Moines area, that means familiarity with local code requirements and the outdated wiring systems common in older homes.
Do home inspectors check electrical wiring?
General home inspectors perform a surface-level visual review of accessible electrical components, but they are not licensed electricians and are not required to remove panel covers or perform circuit-level testing. A separate electrical safety inspection by a licensed electrician is advisable for any home purchase or older property.