Introduction
Every year, faulty electrical panels start house fires that most homeowners never saw coming. According to the National Fire Protection Association (NFPA), electrical distribution and lighting equipment causes an estimated 32,620 home fires annually — resulting in 430 deaths, 1,070 injuries, and $1.3 billion in property damage.
For homes 30 years or older, the risk is higher. Components degrade, connections loosen, and aging equipment struggles to handle modern electrical loads.
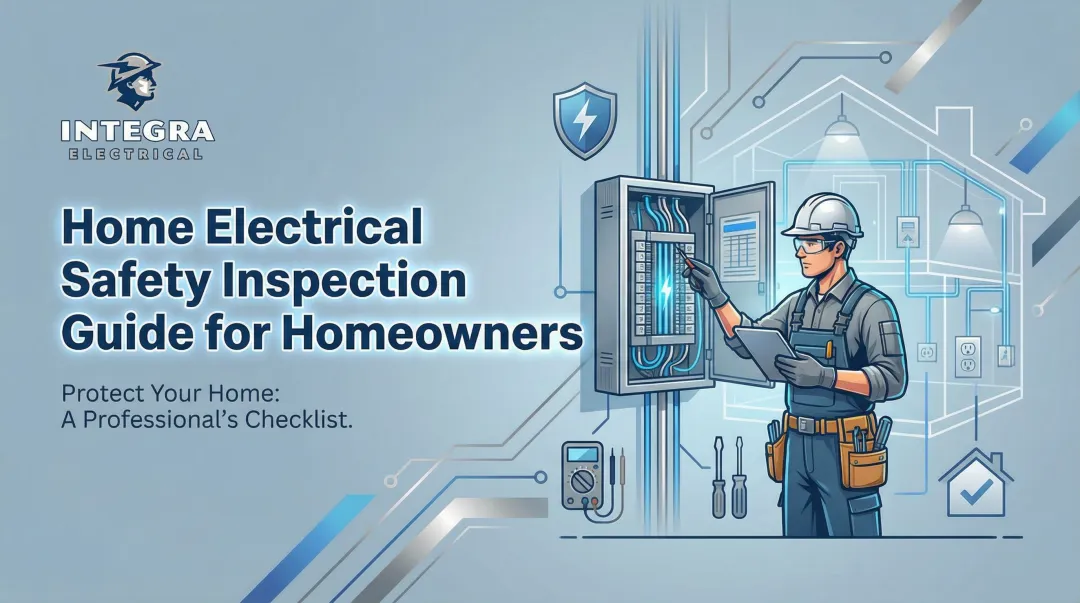
Skipping routine panel inspections is one of the most common oversights homeowners make — and one of the most dangerous. This guide delivers a component-by-component checklist you can use to visually assess your panel, spot warning signs, and know exactly when to call a licensed electrician.
While this checklist empowers you to spot issues, electrical panels carry live voltage at all times—even with the main breaker off. Understanding where the line falls between safe observation and hands-on work is critical to protecting yourself and your home.
Key Takeaways
- A safe panel inspection checks accessibility, physical condition, breaker sizing, wiring integrity, grounding, and labeling—without touching live components
- Schedule professional inspections every 5–10 years, after major renovations, or if you notice frequent breaker trips, burning smells, or discoloration
- Red flags: scorch marks, corrosion, double-tapped breakers, missing knockouts, and outdated brands like Federal Pacific or Zinsco
- Homes 30+ years old face higher risk from aged wiring, undersized service, and outdated components; professional evaluation is essential
What You Need Before Starting an Electrical Panel Inspection
A safe visual inspection requires minimal equipment but proper preparation. Gather these items before you begin:
- Non-contact voltage tester – Confirms voltage presence without touching components
- Flashlight or headlamp – Provides clear visibility in dimly lit areas
- Notepad or smartphone – Documents observations and photographs unusual conditions
- Camera – Captures evidence of potential issues to share with an electrician
Preconditions and Setup
Before inspecting your panel, confirm these access requirements are met:
- Clear working space – The NEC requires at least 36 inches of depth, 30 inches of width, and 78 inches of headroom in front of any panel. Remove boxes, furniture, or stored items blocking access — restricted clearance is a code violation and a safety hazard.
- Adequate lighting – NEC 110.26(D) requires artificial illumination for indoor working spaces around service equipment and panelboards. If the area is dim, bring a portable work light.
- Dry environment – Never inspect near moisture or standing water. Wet conditions create immediate shock risk and may signal a more serious underlying problem.
Critical Limitation: Keep the Dead-Front Cover On
The dead-front cover exists for a reason. InterNACHI's Standards of Practice do not require home inspectors to remove panelboard cabinet covers because doing so exposes live, electrified bus bars. Without proper training and PPE, removing the cover is strongly discouraged — and not required under home inspection standards.
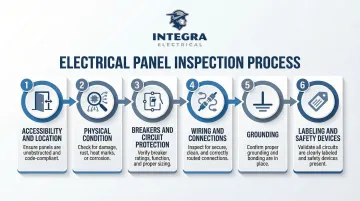
Electrical Panel Inspection Checklist: Step-by-Step
This section provides a logical, category-by-category walkthrough for assessing your panel's condition. Record all findings and share them with a licensed electrician for evaluation.
Accessibility and Location
Prohibited Locations
Verify your panel is not installed in restricted areas. The NEC strictly prohibits panels in:
- Bathrooms – NEC 240.24(E) prohibits overcurrent devices in bathrooms, showering facilities, or locker rooms
- Closets – NEC 240.24(D) prohibits panels near easily ignitable materials like clothes closets
- Over stairway steps – NEC 240.24(F) prohibits devices over steps
Working Clearance Check
Confirm these minimum clearances:
- At least 36 inches of clear space in front of the panel
- No stacked items, boxes, or furniture blocking access
- Cabinet door opens fully without obstruction
- Panel mounted securely to wall
Gap Inspection
Check the gap between the panel cabinet edge and wallboard. NEC 312.4 requires gaps not exceed 1/8 inch for recessed cabinets in noncombustible surfaces to contain potential arc flashes and prevent sparks from igniting surrounding materials.
Physical Condition of the Panel
Visual Damage Assessment
Inspect the exterior and interior (cover on) for:
- Rust or corrosion
- Moisture staining or water marks
- Scorch marks or burn discoloration
- Cracked or damaged cabinet
- Signs of overheating (melted plastic, discolored metal)
Any of these signs indicate a potentially dangerous problem requiring immediate professional assessment.
Hazardous Panel Brands
Check the panel manufacturer label. Three historical brands possess inherent design flaws that cause fires regardless of their lack of federal recall:
| Brand | Visual Identifiers | Primary Failure Mode |
|---|---|---|
| Federal Pacific Electric (FPE) Stab-Lok | Red breaker handles, "Stab-Lok" label, punched bus | High failure-to-trip rate, bus overheating, jamming of common trip mechanism |
| Zinsco / GTE-Sylvania | Red/blue/green toggles, deep slotted breakers, flat aluminum bus bars | Aluminum bus reacts with copper breakers, causing melting and failure to trip |
| Bulldog Pushmatic | Rectangular push-button breakers (no toggles), Bulldog logo | Thermal-only trip design, lacks magnetic protection, internal grease dries causing failure |
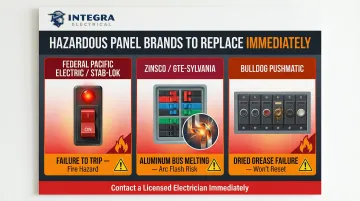
If your home has any of these panels, replacement isn't optional — it's overdue. Insurance companies increasingly refuse to cover homes with FPE, Zinsco, or Pushmatic panels, and the fire risk documented by forensic engineers is well-established.
Breakers and Circuit Protection
Main Disconnect Check
Identify whether your panel has:
- Single main breaker – One large breaker that shuts off all power (modern standard)
- Split-bus panel – Up to six breakers serving as the service disconnect under the historical "Rule of Six"—these lack the backup protection of a single main breaker
Note the main breaker's amperage rating (stamped on the handle). Most modern homes require 100–200 amps. The 1959 NEC introduced the requirement that homes with initial loads of 10 kW or more must have at least 100-amp service. Today, 200-amp service has become standard for handling modern loads like EVs and heat pumps.
Breaker Condition Inspection
Check all breakers for:
- Breakers stuck in tripped position
- Loose breakers that wiggle on the bus
- Breakers sitting between on and off positions
- Mismatched breaker brands (different manufacturer from panel)
Double-Tap Detection
Look for two wires connected to a single breaker terminal. NEC 110.14(A) requires terminals to be explicitly listed for multiple conductors — otherwise, only one wire is permitted per terminal.
Some manufacturers (Cutler-Hammer CH, Square D QO) produce breakers rated for two conductors. If the breaker isn't explicitly listed for it, double-tapping creates arcing and overheating risks.
Knockout Coverage
Verify all unused breaker knockout openings are filled. Open holes allow pests, moisture, and fingers to contact live components inside the panel.
Wiring and Connections
Visible Wire Inspection
With the cover on, look for wires visible outside the cabinet:
- Frayed insulation
- Cracked or brittle sheathing
- Improperly stripped conductors
- Heat damage (melted sheathing, discoloration near terminals)
Aluminum Wiring Alert
If your home was built between 1965 and 1973, it may contain solid aluminum branch-circuit wiring. Homes wired with aluminum are 55 times more likely to reach "Fire Hazard Conditions" at connections than copper-wired homes due to galvanic corrosion, oxidation, and connection loosening over time.
Flag aluminum wiring for licensed evaluation. Remediation requires CPSC-approved methods like COPALUM crimp connectors or AlumiConn lugs.
Cable Entry Point Check
Verify that:
- All cable entry points (knockouts) have proper clamps or connectors
- Cables are secured to the cabinet per NEC 312.5(C)
- Cables are not pinched by the cabinet door
- No open knockout holes remain uncovered
Grounding, Labeling, and Safety Devices
Grounding Electrode Conductor
Verify a grounding electrode conductor (bare or green copper wire) runs from the panel to:
- A grounding rod driven into the earth
- A metal underground water pipe
- A concrete-encased electrode (Ufer ground)
NEC 250.52(A)(5) requires rod electrodes be at least 8 feet in length, with the upper end flush with or below ground level unless protected against physical damage.
If you can safely access the exterior grounding point, verify the rod is at or just below ground level.
Circuit Labeling Review
Check that:
- Every breaker is labeled specifically (not just "plugs" or "lights")
- Labels identify room and circuit type (e.g., "Kitchen counter outlets," "Master bedroom")
- Panel directory is legible and attached to the door
GFCI and AFCI Presence
Look for GFCI (ground-fault) and AFCI (arc-fault) breakers. Under current code, GFCI protection is required for bathrooms, garages, outdoors, crawl spaces, basements, kitchens, and laundry areas. Older panels commonly lack AFCIs entirely — a licensed electrician can assess upgrade needs.
How to Interpret Your Findings — and When to Call an Electrician
What you observe during this checklist falls into three categories, each requiring a different response.
Everything Looks Normal
A healthy panel displays:
- Clean, dry interior with no rust or corrosion
- All breakers correctly labeled and seated firmly
- No scorch marks, discoloration, or moisture staining
- Proper clearance (36″ × 30″ × 78″)
- Visible and secure grounding conductor
- No double-tapped breakers or open knockouts
- Single main disconnect with appropriate amperage
Even if all items check out, electricians still recommend a professional inspection every 5–10 years for code compliance—especially in homes 30+ years old.
Minor Issues to Monitor
Some findings warrant correction but aren't emergencies:
Homeowner-Addressable Issues:
- Faded or missing circuit labels (update the directory)
- Clearance space blocked by stored items (clear the area)
- Dusty panel interior (wipe exterior only—never touch internal components)
Requires Licensed Electrician (Non-Emergency):
- Single unlabeled breaker
- Missing knockout cover
- One improperly stripped wire visible outside cabinet
- Slightly loose cabinet mounting
These issues can typically be scheduled at your convenience. The ones below cannot.
Red Flags That Need Immediate Professional Attention
Contact a licensed electrician same-day if you observe:
- Scorch marks, burn discoloration, or burning smell
- Any breaker that won't reset or sits between on and off
- Visible corrosion or signs of water intrusion
- Aluminum branch-circuit wiring (homes 40+ years old)
- Federal Pacific, Zinsco, or Pushmatic panel
- Main service rated under 100 amps with modern electrical loads
- Sparking, unusual heat, or buzzing sounds
For Des Moines metro homeowners—especially those with homes 30 years or older—Integra Electrical offers a complimentary Safety Evaluation using a Digital Voltage Analyzer. It detects overloaded circuits and uncovers hidden risks that a visual inspection alone can miss.
Same-day appointments are available. Call Integra at (515) 442-0025 to schedule.
Common Mistakes to Avoid During a Panel Inspection
Three errors come up repeatedly during homeowner panel inspections — each one avoidable with the right expectations going in.
Never Open the Dead-Front Cover Bus bars inside remain energized even with the main breaker off, and accidental contact can be fatal. Removing the dead-front cover without proper training and PPE is the most dangerous mistake a homeowner can make. Visual observation with the cover on is sufficient and safe.
Don't Mistake "Working" for "Safe" A panel that hasn't tripped and shows no outward damage can still harbor loose connections, undersized wiring, or failing breakers. Hidden deterioration is especially common in older homes, where components degrade behind closed covers without any outward warning signs.
Don't Assume Circuit Labels Are Accurate Cutting power to the wrong circuit during an emergency or repair is a real risk when labels are missing, outdated, or wrong. If the directory looks incomplete or questionable, have a licensed electrician trace and verify each circuit to create a reliable map of your panel.
Safety Precautions for Home Electrical Panel Inspections
Even a visual inspection of your electrical panel carries real risk. Before you look at anything, follow these non-negotiable rules:
- Never touch terminals, wires, or bus bars
- Keep hands away from any open knockout or gap in the cabinet
- Avoid inspecting near moisture or in wet basements
- Never use metal tools inside or near an open panel
- Always perform inspections with the dead-front cover in place
At minimum, wear rubber-soled shoes and safety glasses. For older or problematic panels, have a second person nearby in case something goes wrong.
If You See Burning, Sparking, or Unusual Heat
Stop immediately. Vacate the area and call a licensed electrician. Do not attempt to inspect, reset breakers, or troubleshoot a panel that is actively showing these signs.
Frequently Asked Questions
What does an electrical panel inspection consist of?
A panel inspection covers accessibility, physical condition, breaker labeling and sizing, wiring integrity, grounding, and safety devices. Homeowner visual inspections examine the panel exterior and accessible components. Professional inspections go further, using testing equipment to measure voltage, insulation resistance, and thermal conditions.
How much does an electrical panel inspection cost?
Professional electrical inspection costs range from $75 to $500, with most homeowners paying around $150. Standard inspections covering wiring, outlets, breakers, and panels typically cost $100–$200. Some electricians, like Integra Electrical serving the Des Moines metro, offer complimentary initial safety evaluations.
What electrical tests are performed during an electrical panel inspection?
Professional inspections typically include voltage testing, insulation resistance testing, GFCI/AFCI function testing, breaker operation testing, and thermal scanning with infrared cameras. This goes well beyond a visual inspection and can detect hidden problems like overloaded circuits and deteriorating connections.
Do home inspectors check electrical panels?
Yes, home inspectors examine panel exteriors and typically remove the dead-front cover during real estate inspections. However, inspectors are not licensed electricians under InterNACHI Standards of Practice. If a home inspector flags panel concerns, schedule a follow-up evaluation by a licensed electrician for a detailed assessment and remediation recommendations.
What is the 80% rule for electrical panels?
Circuit breakers should not be loaded beyond 80% of their rated amperage on a continuous basis (loads lasting 3+ hours). Under NEC Article 100, the breaker must be sized at 125% of the continuous load, meaning a 20-amp breaker should carry no more than 16 amps continuously. Running near full capacity generates excessive heat and accelerates breaker failure.
What types of electrical inspections are there?
Four main types serve different purposes:
- Homeowner visual – Checks for obvious damage without removing covers
- Professional safety – Licensed electrician inspects internal components behind the dead-front
- Home inspection – General real estate inspection of visible electrical components
- Code compliance – Municipal inspector verifies new installations meet NEC before restoring power
Use this checklist to inspect your electrical panel safely, document what you find, and decide when to bring in a licensed electrician. For homes 30 years or older in the Des Moines metro, Integra Electrical offers a complimentary Safety Evaluation that gives aging electrical systems the thorough review they need.